
I am finally featuring it here to show the latest one in preparation for the arrival of June, my mom-in-law, in preparation for Ella's first birthday party~!
I'll show you how I went from this:
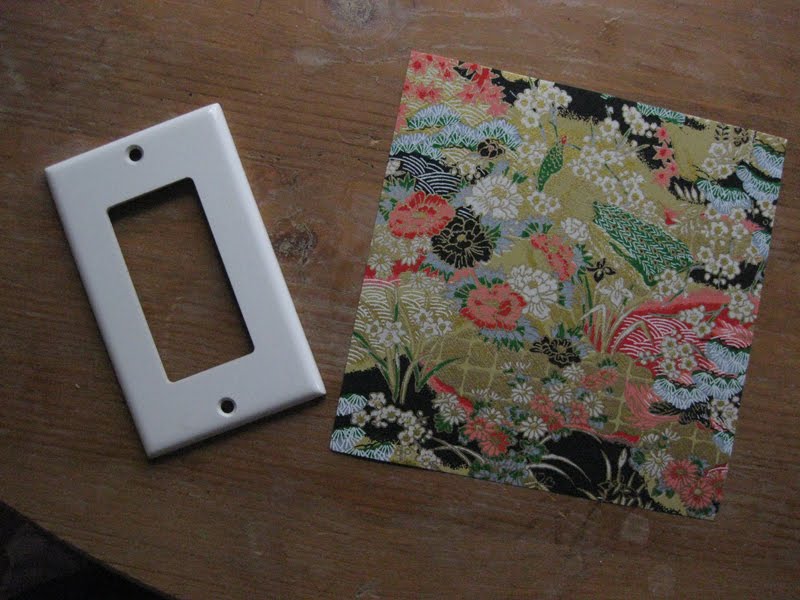
To this:
 Besides the light switch cover and paper of your choice, this little project only requires the few following materials:
- Mod Podge
- clear acrylic sealer
- sand paper
- X-Acto knife or scissors
Let's begin!
1) Sand the plate until it is just scratched (this will help the design stick to the plastic better) and then wipe down with a damp cloth.
2) Lay out your design on your plate, folding it tightly around the edges.
3) Poke holes in the design through both screw holes with a blade and then pen
4) Cut an X in the switch hole starting at each corner and fold the flaps over to the back of the plate.
5) Remove the design and trim until about 1" overhangs all sides, snipping off the excess at the corners too.
6) Apply a medium coat of Mod Podge to the front of the plate and the back of the design.
7) Quickly now, place the design on the plate and position it by lining up the holes for the screw holes.
8) Working from the center, smooth out the design, using a pen to re-establish the screw holes and smooth that whole situation out.
9) Apply more Mod Podge, this time to the back flaps, to stick nice and close to the back of the plate. Coat all this with a thin layer of Mod Podge for extra security.
It will look something like this:

10) Set the plate, face up, on an overturned yogurt container or any other such thing that can act as a pedestal for your plate to rest on with minimal contact.
11)Let it dry for a couple of minutes, then apply 2-3 coats of Mod Podge to the face of the plate, letting it dry 3-5 minutes between coats.
12) Let it dry again and then spray with 2 coats of acrylic sealer.
13) Mount to your light switch hole in the wall, screw in place, and enjoy!!
Here are some other ones I've done around the house:


The more switches, the harder, that's for sure.
And all the designs came from a stash of nice Japanese paper I received some years back. That means the paper is somewhat thinner than other stocks and the coloration on them is gorgeous~!
And for those of you who have covers with a far smaller flip-switch, lucky you! That means more surface area for your design to cover, instead of a big, white switch. {:)
Well, either way, I hope some of you try to give this a go yourselves and enjoy the end result!
Keep me posted if you do!!
'til then~ ♡
this is so great! I can think of some pictures I would want to put up around
ReplyDelete